Kube Scheduler
In this tutorial, we are going to discuss Kube Scheduler in Kubernetes. Kube Scheduler is one of the key components of the Kubernetes master. This is only responsible for deciding which pod goes on which node. It doesn’t actually place the pod on the nodes. That’s the job of kubelet.
In Kubernetes, the scheduler decides which nodes the pods are placed on depending on specific criteria. You may have pods with different resource requirements. You can have nodes in the cluster dedicated to specific applications.
Finally, after figuring out the node, the scheduler will update the resource specification and send it to the Kube API Server. The API Server updates the resource specification and stores it into ETCD. The API Server notifies the kubelet for the worker node selected by the scheduler.
How does the scheduler assigns these pods?
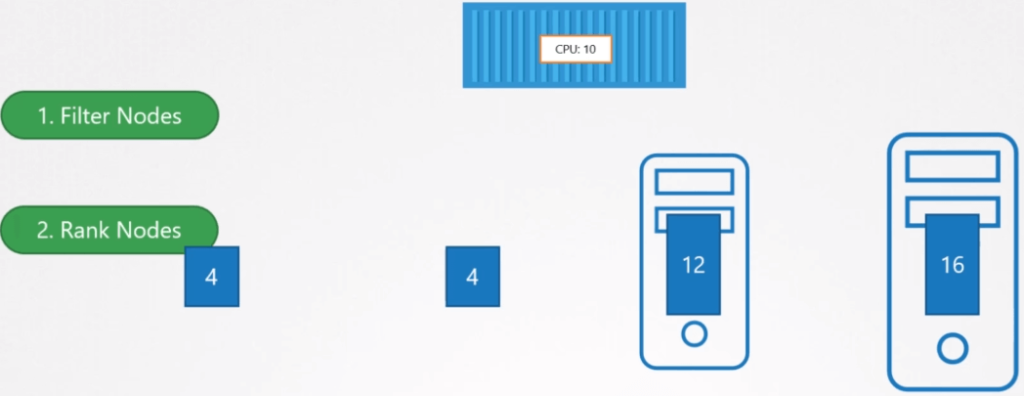
The scheduler looks at each pod and tries to find the best node for it. For example,

In the above picture, the pod has CPU and memory requirements. The scheduler goes through 2 phases to identify the best node for the pod.
In the first phase, the scheduler tries to filter out the nodes that don’t fit the requirement for this pod. For example, the nodes that don’t have sufficient CPU and memory resources requested by the pod. So the first 2 small nodes are filtered out.

So we are now left with 2 nodes on which the pod can be placed. Now how does the scheduler pick one node from the 2 nodes. The Kube Scheduler ranks the nodes to identify the best fit for the pod. It uses the priority function to assign a score to the node on a scale of 0 to 10.
For example, the scheduler calculates the number of resources that would be free on the node after placing the pod.

In this case, the 3rd node would have 2 CPU’s and the 4th node have 6 CPUs free. So here 4th node gets a better rank compared with the 3rd node. Now Kube Scheduler will place the pod in 4th node.

We can customize the Kube scheduler. You can write your own scheduler as well.