API Gateway Pattern Example
In this tutorial, we are going to discuss about the API Gateway Pattern Example. Let’s go through a Java code example to demonstrate how the API Gateway pattern comes to life.
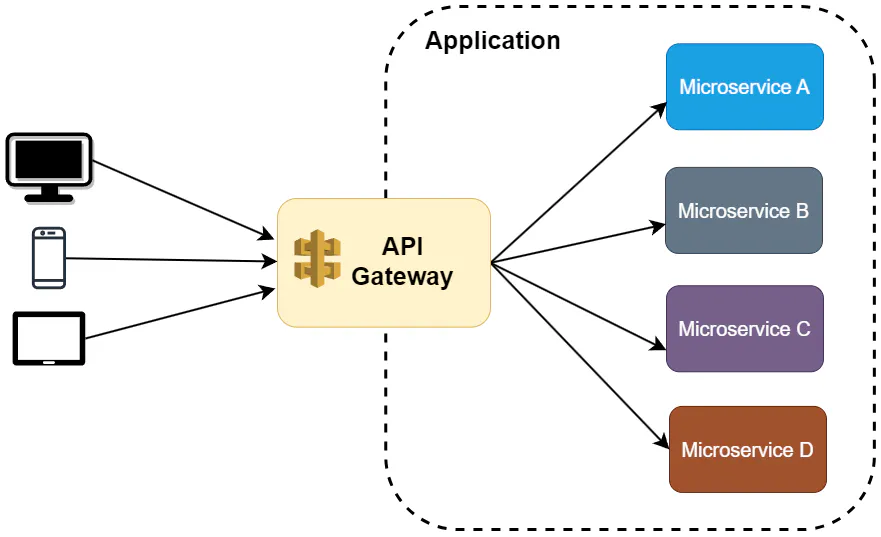
Let’s consider a detailed example of how an API Gateway pattern might be implemented for an e-commerce platform. This platform has several microservices, including User Service, Product Service, Order Service, and Payment Service. Here’s how the API Gateway manages interactions between the client (e.g., a web or mobile app) and these microservices.
Components Involved
- Client: Web or mobile application making requests.
- API Gateway: Central entry point for all client requests.
- User Service: Manages user information and authentication.
- Product Service: Handles product catalog and details.
- Order Service: Manages orders, including creation and tracking.
- Payment Service: Processes payments.
Workflow
1. User Authentication
- Client Request: The client sends a login request to the API Gateway (
POST /login). - API Gateway: Routes the request to the User Service.
- User Service: Authenticates the user and returns a JWT token.
- API Gateway: Forwards the token back to the client.
2. Viewing Product Catalog
- Client Request: The client requests the product catalog (
GET /products). - API Gateway: Routes the request to the Product Service.
- Product Service: Retrieves the product information and sends it back to the API Gateway.
- API Gateway: Forwards the product data to the client.
3. Placing an Order
- Client Request: The client places an order (
POST /orders), including the product ID and payment details. - API Gateway:
- Verifies the user’s JWT token.
- Routes the request to the Order Service.
- Order Service:
- Creates the order.
- Calls the Payment Service to process the payment.
- Payment Service: Processes the payment and returns the result to the Order Service.
- Order Service: Confirms the order creation and sends a response to the API Gateway.
- API Gateway: Forwards the final order confirmation to the client.
Example Implementation
API Gateway (Simplified using Express.js)
const express = require('express');
const axios = require('axios');
const jwt = require('jsonwebtoken');

const app = express();
app.use(express.json());

// Route for user login
app.post('/login', async (req, res) => {
    const response = await axios.post('http://userservice/login', req.body);
    res.send(response.data);
});

// Middleware for token verification
app.use((req, res, next) => {
    const token = req.headers['authorization'];
    if (!token) return res.status(403).send('Token is required');
    jwt.verify(token, 'secretKey', (err, user) => {
        if (err) return res.status(403).send('Invalid token');
        req.user = user;
        next();
    });
});

// Route for getting products
app.get('/products', async (req, res) => {
    const response = await axios.get('http://productservice/products');
    res.send(response.data);
});

// Route for placing orders
app.post('/orders', async (req, res) => {
    try {
        const orderResponse = await axios.post('http://orderservice/orders', req.body);
        const paymentResponse = await axios.post('http://paymentservice/payments', req.body);
        res.send({
            order: orderResponse.data,
            payment: paymentResponse.data
        });
    } catch (error) {
        res.status(500).send(error.response.data);
    }
});

app.listen(3000, () => console.log('API Gateway running on port 3000'));
User Service (Simplified)
const express = require('express');
const jwt = require('jsonwebtoken');
const app = express();
app.use(express.json());

app.post('/login', (req, res) => {
    const { username, password } = req.body;
    // Dummy authentication
    if (username === 'user' && password === 'password') {
        const token = jwt.sign({ username }, 'secretKey');
        res.send({ token });
    } else {
        res.status(401).send('Invalid credentials');
    }
});

app.listen(4000, () => console.log('User Service running on port 4000'));
Product Service (Simplified)
const express = require('express');
const app = express();

const products = [
    { id: 1, name: 'Product 1', price: 100 },
    { id: 2, name: 'Product 2', price: 200 }
];

app.get('/products', (req, res) => {
    res.send(products);
});

app.listen(5000, () => console.log('Product Service running on port 5000'));
Order Service and Payment Service
Implement these services similarly to the above services, with appropriate routes and logic for creating orders and processing payments.
Benefits Illustrated
- Centralized Authentication: The API Gateway handles token verification, so each service doesn’t need to manage authentication.
- Simplified Client: Clients interact with a single endpoint (
api.example.com), reducing complexity. - Security: The API Gateway can enforce security policies and rate limits.
- Performance: Caching frequently requested data like product catalogs can be implemented at the API Gateway level.
- Aggregation: The API Gateway can combine results from multiple services, such as order and payment confirmations, into a single response.
This example demonstrates how the API Gateway pattern simplifies client interactions, centralizes cross-cutting concerns like authentication and logging, and enhances the overall architecture’s flexibility and security.
That’s all about the API Gateway Pattern Example. If you have any queries or feedback, please write us email at contact@waytoeasylearn.com. Enjoy learning, Enjoy Micro services..!!